Difference between revisions of "*NEW* LaunchPoint Caravan"
(→Re-fit plan) |
m (NEW LPV →New Caravan) |
||
| (13 intermediate revisions by 5 users not shown) | |||
| Line 1: | Line 1: | ||
| + | ==Solar Charge Controller== | ||
| + | The solar (Photo Voltaic - PV) panel, connected directly to the battery, was found to be charging at >16V! This is not good for the battery, lamp and control circuits. A Pulse Width Modulation (PWM) charge controller [http://www.bimblesolar.com/offgrid/chargers/10apwm Type 10I, 10A, 12/24V] from [http://www.bimblesolar.com Bimble Solar] is installed. The controller is powered by the battery and ''may'' be damaged if the panel is connected with no power from the battery. | ||
| + | |||
| + | |||
| + | <center>'''N.B. Disconnect the PV panel (2nd CB from left) before disconnecting the battery terminals!'''.</center> | ||
| + | |||
| + | [[File:Isolate Solar Panel CB2.jpg | center]] | ||
| + | |||
| + | |||
| + | <blockquote> | ||
| + | [[File:Solar Controller 10iPWM.jpg]] | ||
| + | |||
| + | |||
| + | |||
| + | {| | ||
| + | |- | ||
| + | | '''Instruction Manual:''' [[Media:10i-ec Solar Controller Manual.pdf|Acrobat (PDF) (4.91MB)]] (Hardcopy in caravan filing drawer) | ||
| + | |- | ||
| + | |There are three LEDs: | ||
| + | |||
| + | * Solar Panel LED: | ||
| + | ** Green on: solar panel is charging the battery. | ||
| + | ** Green blink: over voltage | ||
| + | |||
| + | *Battery LED: | ||
| + | ** Green on: good battery level | ||
| + | ** Green slowly flashing: battery fully charged | ||
| + | ** Yellow on: battery level low | ||
| + | ** Red on: load fault (not currently in use). | ||
| + | |||
| + | * Load LED: Not currently in use. | ||
| + | |||
| + | | Specification: | ||
| + | * Equalisation voltage: 14.8V | ||
| + | * High voltage disconnect(HVD): 14.4V | ||
| + | * Float voltage: 13.6V | ||
| + | * Low voltage disconnect(LVD) 11.1V | ||
| + | * Low voltage reconnect(LVR): 12.6V | ||
| + | * Self-consumption: 6mA maximum | ||
| + | * Temperature compensation: -30mV/℃/12V | ||
| + | * Terminals: for wire sizes to 6mm2 | ||
| + | * Temperature: -35℃ to +55℃ | ||
| + | |} | ||
| + | </blockquote> | ||
| + | |||
| + | ==Solar cells== | ||
| + | |||
| + | An additional solar cell was fitted to the roof in summer 2015 | ||
| + | |||
| + | ==Damage== | ||
| + | |||
| + | As may have been predicted heavy use of an already 'lifed out' caravan has started to cause the bodywork to come apart. Regular inspection and running repairs will be needed to keep ahead of this. | ||
| + | |||
| + | ==Battery regime== | ||
| + | |||
| + | Having experienced less than expected service life from previous leisure batteries, it was decided in October 2015 to buy two leisure batteries and swap them over each month so that they could be alternately fully charged. It is believed that this will prolong the life of the batteries. | ||
| + | |||
==New Caravan== | ==New Caravan== | ||
| + | This refers to a Launch Point Caravan which has subsequently been scrapped (2018) because it was breaking up from being towed over bumps. The replacement Launch Point vehicle is an ex Red Cross site trailer fitted out mainly by Ken Hansell and Tony Palmer in 2017-18. The communications and electrical equipment was transferred across. This LPV, has amongst other equipment, A solar charger on the roof, a battery hidden below the parachute racks, a battery charge controller, a 12v distribution board, a charger feeding a mobile phone, the VHF 129.90 MHz radio and a USB socket. Also a pair of parallel-connected LED signaling lights fed from the original signaling control station. Also a worksurface with a gas hob fed from a propane bottle in a locker on the rhs rear. The detailed description of equipment below may or may not be current and should be verified. | ||
| + | |||
March(?) 2010: Chris Bessent arranged the purchase of a cheap caravan that can be turned into the new launch point caravan. Steve Barber and Alan Saunders and others have stripped the interior of all its furniture and fittings ready for the the re-fit. | March(?) 2010: Chris Bessent arranged the purchase of a cheap caravan that can be turned into the new launch point caravan. Steve Barber and Alan Saunders and others have stripped the interior of all its furniture and fittings ready for the the re-fit. | ||
| − | ==Re-fit plan== | + | == Update 09/01/11 == |
| + | |||
| + | OK, so we didn't make the Oct 10 target. But there is progress, thanks to John Turk. Additional floor fitted, next step to attach wall to floor to strengthen whole thing, then move on to to interior furnishings. | ||
| + | SB 09/01/11 | ||
| + | |||
| + | ==Re-fit plan (Spring 2010)== | ||
The aim is to get the caravan refitted during Summer 2010, ready for use in October 2010. | The aim is to get the caravan refitted during Summer 2010, ready for use in October 2010. | ||
*Fit new floor to caravan: 3/4" plywood or OSB (Existing floor (chipboard?) is very spongy and won't last long) | *Fit new floor to caravan: 3/4" plywood or OSB (Existing floor (chipboard?) is very spongy and won't last long) | ||
*If necessary, cross-beams can be fitted below the floor. Either wooden or metal (welded to caravan's perimeter chassis) | *If necessary, cross-beams can be fitted below the floor. Either wooden or metal (welded to caravan's perimeter chassis) | ||
| − | *Corner legs to be checked and | + | *Corner legs to be checked and fixed / replaced if necessary. |
| − | *Check jockey wheel. Fix broken bracket. | + | *Check jockey wheel. Fix broken bracket. |
| + | (Done - rewelded by Peter Ellison in April. SB13/6) | ||
*Reinforcing frame to be fitted around the doorway - wood or preferably steel. (people pull themselves up into the caravan by pulling heavily on the sides - leading to distrortion and cracks) | *Reinforcing frame to be fitted around the doorway - wood or preferably steel. (people pull themselves up into the caravan by pulling heavily on the sides - leading to distrortion and cracks) | ||
*Handles to be fitted to the outside for ease of moving the caravan. Strongly recommend fitting structural elements (preferably welded steel) to transfer forces to the chassis of the caravan, not just bolt them to the flimsy walls. | *Handles to be fitted to the outside for ease of moving the caravan. Strongly recommend fitting structural elements (preferably welded steel) to transfer forces to the chassis of the caravan, not just bolt them to the flimsy walls. | ||
| − | *Check: Is the caravan weather tight? If not, fix the leaking areas. (This | + | *Check: Is the caravan weather tight? If not, fix the leaking areas. (This caravan will probably be stored outside) |
| − | *Fit lino / | + | *: Need to replace window catch rubber toggles (flexi catches?) - available from caravan shops or Ebay. |
| + | *Fit lino / similarly hardwearing & waterproof covering to floor. | ||
*DECISION: Which way round should the caravan be orientated in use? (Facing up the field / across the field?) | *DECISION: Which way round should the caravan be orientated in use? (Facing up the field / across the field?) | ||
* Obtain and fit worktop, and legs. Include cut-out for the signal/timing box of electronics. Would be nice to have a removable perspex top - notices could be put underneath this. | * Obtain and fit worktop, and legs. Include cut-out for the signal/timing box of electronics. Would be nice to have a removable perspex top - notices could be put underneath this. | ||
| + | I recommend flat-pack desk from Ikea or similar. Signal unit could be surface mounted. SB 13/6 | ||
*DECISION: Work out where the following items are to be located - bearing in mind ergonomics, and the centre of gravity of the finished/loaded caravan. Ideally the caravan will only have slight nose weight to allow for easy positioning. | *DECISION: Work out where the following items are to be located - bearing in mind ergonomics, and the centre of gravity of the finished/loaded caravan. Ideally the caravan will only have slight nose weight to allow for easy positioning. | ||
*Obtain and build/install racking / shelving / cupboard for parachutes (probably best located over the axle for CofG reasons) | *Obtain and build/install racking / shelving / cupboard for parachutes (probably best located over the axle for CofG reasons) | ||
| + | I recommend pine flat-pack self-assembly units obtainable from Ikea - easier than build from scratch SB 13/6 | ||
*Obtain and build/install shelving / cupboards for: forms, pens, paperwork, flight manuals, barograph, binoculars, cushions & packing, etc. | *Obtain and build/install shelving / cupboards for: forms, pens, paperwork, flight manuals, barograph, binoculars, cushions & packing, etc. | ||
*Obtain or build a storage box for lead ballast weights. Again, probably best to be over the axle. Needs to be very strong and located above a main chassis rail. | *Obtain or build a storage box for lead ballast weights. Again, probably best to be over the axle. Needs to be very strong and located above a main chassis rail. | ||
| Line 21: | Line 89: | ||
*Fit notice boards to internal wall. | *Fit notice boards to internal wall. | ||
*Paint caravan exterior. Probably copy existing red and white check pattern for walls and matt black for the roof. | *Paint caravan exterior. Probably copy existing red and white check pattern for walls and matt black for the roof. | ||
| + | *: Black will produce a high heat gain but is possibly needed as a background to the signalling lamp. (AS 13/6) | ||
*Choose position and copy existing mounting system to attach windsock and mast to the new caravan. | *Choose position and copy existing mounting system to attach windsock and mast to the new caravan. | ||
*DECIDE: What signal lights to use? How to mount them, considering: Ease of visibility for winch driver, ease of adjusting the positioning, etc. Make mounts and fit to the caravan. | *DECIDE: What signal lights to use? How to mount them, considering: Ease of visibility for winch driver, ease of adjusting the positioning, etc. Make mounts and fit to the caravan. | ||
| + | *: Furneaux Riddall (Portsmouth) have an LED Work Light [http://www.furneauxriddall.com/shop/acatalog/LED_Work_Light.html#a7450 link] (ref:7450) £65 which may be good as a signalling light. At 15W it should be at least as bright as a 75W Halogen and at 1.29A voltage dop will not be a problem. Will also extend battery life. Beam angle may be too wide? (AS 13/6) | ||
*Decide on position of blackboard on outside of caravan. (or upgrade to whiteboard?) | *Decide on position of blackboard on outside of caravan. (or upgrade to whiteboard?) | ||
*Battery to be fitted to the existing battery box on the A-frame. Arrange battery clamp and new leads and THICK, good quality wiring. | *Battery to be fitted to the existing battery box on the A-frame. Arrange battery clamp and new leads and THICK, good quality wiring. | ||
Latest revision as of 16:28, 19 October 2021
Contents
Solar Charge Controller[edit]
The solar (Photo Voltaic - PV) panel, connected directly to the battery, was found to be charging at >16V! This is not good for the battery, lamp and control circuits. A Pulse Width Modulation (PWM) charge controller Type 10I, 10A, 12/24V from Bimble Solar is installed. The controller is powered by the battery and may be damaged if the panel is connected with no power from the battery.

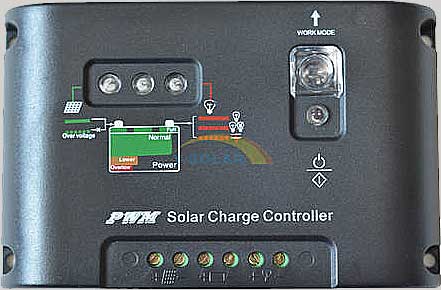
Instruction Manual: Acrobat (PDF) (4.91MB) (Hardcopy in caravan filing drawer) There are three LEDs:
- Solar Panel LED:
- Green on: solar panel is charging the battery.
- Green blink: over voltage
- Battery LED:
- Green on: good battery level
- Green slowly flashing: battery fully charged
- Yellow on: battery level low
- Red on: load fault (not currently in use).
- Load LED: Not currently in use.
Specification:
- Equalisation voltage: 14.8V
- High voltage disconnect(HVD): 14.4V
- Float voltage: 13.6V
- Low voltage disconnect(LVD) 11.1V
- Low voltage reconnect(LVR): 12.6V
- Self-consumption: 6mA maximum
- Temperature compensation: -30mV/℃/12V
- Terminals: for wire sizes to 6mm2
- Temperature: -35℃ to +55℃

Solar cells[edit]
An additional solar cell was fitted to the roof in summer 2015
Damage[edit]
As may have been predicted heavy use of an already 'lifed out' caravan has started to cause the bodywork to come apart. Regular inspection and running repairs will be needed to keep ahead of this.
Battery regime[edit]
Having experienced less than expected service life from previous leisure batteries, it was decided in October 2015 to buy two leisure batteries and swap them over each month so that they could be alternately fully charged. It is believed that this will prolong the life of the batteries.
New Caravan[edit]
This refers to a Launch Point Caravan which has subsequently been scrapped (2018) because it was breaking up from being towed over bumps. The replacement Launch Point vehicle is an ex Red Cross site trailer fitted out mainly by Ken Hansell and Tony Palmer in 2017-18. The communications and electrical equipment was transferred across. This LPV, has amongst other equipment, A solar charger on the roof, a battery hidden below the parachute racks, a battery charge controller, a 12v distribution board, a charger feeding a mobile phone, the VHF 129.90 MHz radio and a USB socket. Also a pair of parallel-connected LED signaling lights fed from the original signaling control station. Also a worksurface with a gas hob fed from a propane bottle in a locker on the rhs rear. The detailed description of equipment below may or may not be current and should be verified.
March(?) 2010: Chris Bessent arranged the purchase of a cheap caravan that can be turned into the new launch point caravan. Steve Barber and Alan Saunders and others have stripped the interior of all its furniture and fittings ready for the the re-fit.
Update 09/01/11[edit]
OK, so we didn't make the Oct 10 target. But there is progress, thanks to John Turk. Additional floor fitted, next step to attach wall to floor to strengthen whole thing, then move on to to interior furnishings. SB 09/01/11
Re-fit plan (Spring 2010)[edit]
The aim is to get the caravan refitted during Summer 2010, ready for use in October 2010.
- Fit new floor to caravan: 3/4" plywood or OSB (Existing floor (chipboard?) is very spongy and won't last long)
- If necessary, cross-beams can be fitted below the floor. Either wooden or metal (welded to caravan's perimeter chassis)
- Corner legs to be checked and fixed / replaced if necessary.
- Check jockey wheel. Fix broken bracket.
(Done - rewelded by Peter Ellison in April. SB13/6)
- Reinforcing frame to be fitted around the doorway - wood or preferably steel. (people pull themselves up into the caravan by pulling heavily on the sides - leading to distrortion and cracks)
- Handles to be fitted to the outside for ease of moving the caravan. Strongly recommend fitting structural elements (preferably welded steel) to transfer forces to the chassis of the caravan, not just bolt them to the flimsy walls.
- Check: Is the caravan weather tight? If not, fix the leaking areas. (This caravan will probably be stored outside)
- Need to replace window catch rubber toggles (flexi catches?) - available from caravan shops or Ebay.
- Fit lino / similarly hardwearing & waterproof covering to floor.
- DECISION: Which way round should the caravan be orientated in use? (Facing up the field / across the field?)
- Obtain and fit worktop, and legs. Include cut-out for the signal/timing box of electronics. Would be nice to have a removable perspex top - notices could be put underneath this.
I recommend flat-pack desk from Ikea or similar. Signal unit could be surface mounted. SB 13/6
- DECISION: Work out where the following items are to be located - bearing in mind ergonomics, and the centre of gravity of the finished/loaded caravan. Ideally the caravan will only have slight nose weight to allow for easy positioning.
- Obtain and build/install racking / shelving / cupboard for parachutes (probably best located over the axle for CofG reasons)
I recommend pine flat-pack self-assembly units obtainable from Ikea - easier than build from scratch SB 13/6
- Obtain and build/install shelving / cupboards for: forms, pens, paperwork, flight manuals, barograph, binoculars, cushions & packing, etc.
- Obtain or build a storage box for lead ballast weights. Again, probably best to be over the axle. Needs to be very strong and located above a main chassis rail.
- Obtain / build and fit seating.
- Fit notice boards to internal wall.
- Paint caravan exterior. Probably copy existing red and white check pattern for walls and matt black for the roof.
- Black will produce a high heat gain but is possibly needed as a background to the signalling lamp. (AS 13/6)
- Choose position and copy existing mounting system to attach windsock and mast to the new caravan.
- DECIDE: What signal lights to use? How to mount them, considering: Ease of visibility for winch driver, ease of adjusting the positioning, etc. Make mounts and fit to the caravan.
- Furneaux Riddall (Portsmouth) have an LED Work Light link (ref:7450) £65 which may be good as a signalling light. At 15W it should be at least as bright as a 75W Halogen and at 1.29A voltage dop will not be a problem. Will also extend battery life. Beam angle may be too wide? (AS 13/6)
- Decide on position of blackboard on outside of caravan. (or upgrade to whiteboard?)
- Battery to be fitted to the existing battery box on the A-frame. Arrange battery clamp and new leads and THICK, good quality wiring.
- Choose best position for circuit breakers and battery condition gauge (use the items from the old caravan, just allow for their position, only move them when ready to use the new caravan)
- Install good wiring in the caravan for the signal lights, signal buzzer, signal box, etc.
- When the rest of the caravan is ready, transfer signal controller box, signal lights, battery gauge, circuit breaker, windsock mast, etc to the new caravan.
- Test that everything works as desired.
- Transfer all the paperwork, forms, manuals, etc into the new caravan.
- Use Caravan. (taking care not to destroy it...)

